Most homes today have a pile of devices: a Mac, a Windows laptop, a phone, maybe a tablet. Each one holds a different slice of your files, and moving things between them is harder than it should be. A USB stick works until it doesn’t. Email has size limits. A cloud service works, but the free space runs out and the paid plans add up.
A NAS (network-attached storage) box solves this, but it costs money: the enclosure, the drives, and often a network upgrade. Storage has stayed expensive, and a NAS adds a second device to buy and maintain.
You probably already have the storage you need. It’s the Windows PC sitting in your room. This post shows how to turn that PC into a shared folder that every device in your home can use, using SMB, the file-sharing protocol built into Windows and macOS.
I’ll walk through what I started with, what I set up, the setup steps, and what to watch out for. I’ll also cover why this is practical now, when it wasn’t a few years ago.
What You Get
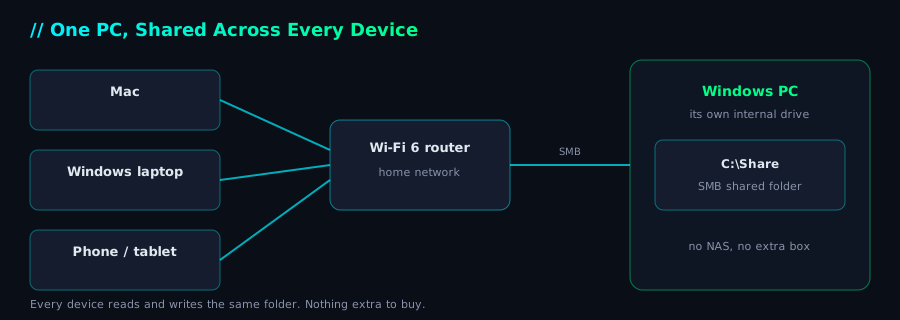
- No extra hardware. The PC’s internal drive is the storage.
- No subscription. Nothing to pay monthly beyond the internet you already have.
- Works across devices. Windows has it built in, macOS connects to it natively, and iPhone can connect through the Files app. Android needs a file manager with SMB support.
- Stays on your network. Files don’t go through the internet, so they’re faster and don’t leave your home.
- Set up in about 10 minutes. The commands are short (below).
Where I Started
My setup was typical of a lot of homes:
- A Windows PC with spare space on its internal drive
- A Mac, another Windows PC, and a phone
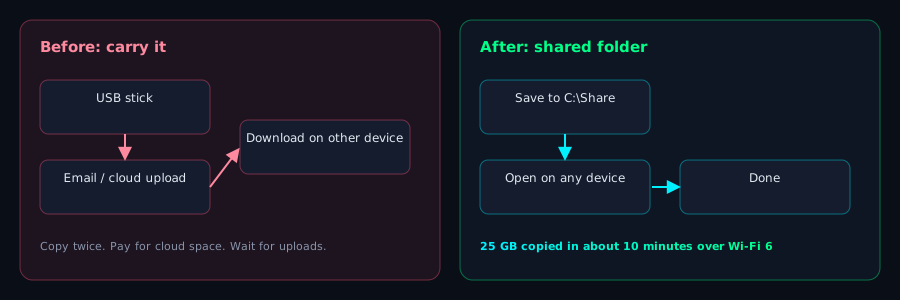
- Transfers done by USB stick, email, or uploading to cloud storage and downloading again
Each transfer meant copying twice, waiting on uploads, or hunting for a stick. I wanted any device to read and write the same folder, with no copy step in between.
What I Achieved
- A shared folder on the Windows PC, reachable from the Mac and another Windows PC
- A dedicated login for the share, so my main Windows account wasn’t involved
- 25 GB copied in about 10 minutes over Wi-Fi 6
That transfer works out to roughly 40 MB/s, or about 330 Mbps. For a home network, that’s fast enough that the wait is no longer the main cost.
Why This Works Now (and Didn’t Before)
A shared folder over the home network is not a new idea. Several things changed to make it practical:
- Wi-Fi 6 is much faster. Wi-Fi 6 (802.11ax) handles more devices and more data per second. Older Wi-Fi standards, like 802.11g and early 802.11n, could give real throughput of only a few MB/s on a good day. Speeds in the tens of MB/s are now realistic when you’re close to the router.
- SMB is built in. Windows 10 and 11 include SMB 3, which supports encryption. macOS has it too, so there’s no software to install on the computers.
- Internal storage is large and fast. A single SSD in a PC can hold more than a whole stack of old USB sticks, and it’s quick enough that the disk is rarely the bottleneck.
- Most devices are on Wi-Fi 6 now. Phones, laptops and routers sold in recent years usually support it, so the network is no longer the weakest part.
Your speed depends on your router, the distance to it, and what else is using the network. Wired Ethernet is faster and more consistent if you can run a cable to the PC.
A Note on USB Drives Between Mac and Windows
A USB stick is still the simplest way to move files when the network isn’t an option. But a drive formatted for one system often doesn’t work on the other, and the error doesn’t always explain why.
| Format | Windows | macOS | Limits and notes |
|---|---|---|---|
| exFAT | Read and write | Read and write | Best choice for a drive shared between Mac and Windows. No practical file-size limit for everyday use. |
| FAT32 | Read and write | Read and write | Works on both, but a single file can’t be larger than 4 GB. |
| NTFS | Read and write | Read only by default | macOS can see the files but can’t copy to the drive without a third-party tool. |
| APFS / Mac OS Extended | Can’t read | Read and write | Mac-only. Windows doesn’t see the drive. |
| ext4 | Can’t read | Can’t read | Linux-only, unless you install extra tools. |
What to do: format the drive as exFAT using Disk Utility on the Mac, or the Windows “Format” option, and use it for files you move between machines.
Two more things to watch for:
- Mac junk files. On exFAT and FAT32 drives, macOS writes hidden helper files
(names starting with
._) and.DS_Storefiles. Windows shows them as clutter, and they’re harmless. Delete them if they bother you. - Eject before unplugging. On both systems, eject the drive from the OS first. Pulling it out during a copy is the most common way to corrupt the files on it.
If a drive shows up on the Mac but you can’t write to it, check the format before you assume it’s broken. NTFS is the usual cause.
Setup Steps
Everything below runs on the Windows PC that will hold the files. Open PowerShell as Administrator.
1. Create the folder
New-Item -ItemType Directory -Path C:\Share -Force
2. Create a dedicated account for the share
Don’t use your main Windows login. A separate account limits what the share can reach and keeps your main password off other devices.
$securePassword = ConvertTo-SecureString '<your-strong-password>' -AsPlainText -Force
New-LocalUser -Name homeshare -Password $securePassword -FullName 'Home Share' -PasswordNeverExpires
Use a strong password. The password I used for this setup was intentionally simple, but a home network is still a network, and a strong password is cheap insurance.
3. Give that account access to the folder
icacls C:\Share /grant 'homeshare:(OI)(CI)M'
(OI)(CI)M means “Modify, applied to the folder and everything inside it.”
4. Share the folder
New-SmbShare -Name Share -Path C:\Share -FullAccess homeshare
5. Turn on file sharing in the firewall
Set-NetFirewallRule -DisplayGroup 'File and Printer Sharing' -Enabled True
Make sure your Wi-Fi is set to a Private network. Windows blocks file sharing on Public networks by default.
6. Give the PC a fixed address in your router
If the PC’s address changes, your share addresses break. In your router’s admin page,
look for a DHCP reservation (sometimes called address reservation). Bind the PC’s
MAC address to an IP like 192.168.x.x, so it’s always the same. The exact menu name
varies by router and ISP firmware.
7. Connect from each device
Another Windows PC: open File Explorer and go to \\192.168.x.x\Share. Or, from
Command Prompt:
net use \\192.168.x.x\Share /user:homeshare <your-strong-password>
Mac: in Finder, press Cmd+K, enter smb://192.168.x.x/Share, choose Registered
User, then enter homeshare and the password.
iPhone: in the Files app, choose Browse → ⋯ → Connect to Server and enter the
same smb:// address.
Android: use a file manager app that supports SMB network shares.
Things That Went Wrong (and How to Avoid Them)
Setting this up didn’t go perfectly. These are the issues worth knowing about before you start.
-
The wrong IP address. The PC had a virtual network adapter that reported a private address, but that wasn’t the real Wi-Fi address. Check which adapter has your router as its gateway:
Get-NetIPConfiguration | Where-Object { $_.NetAdapter.Status -eq 'Up' } -
A “no permission” error from another Windows PC. The share showed up, but opening it failed. The server was set up correctly. Windows was quietly trying the client’s own login first. Connecting with
net useand the share account fixed it. -
A “no permission” error from the Mac. This was the most confusing one. The Mac kept sending a username that doesn’t exist on the PC. The Windows Security log showed it clearly, with Event ID 4625:
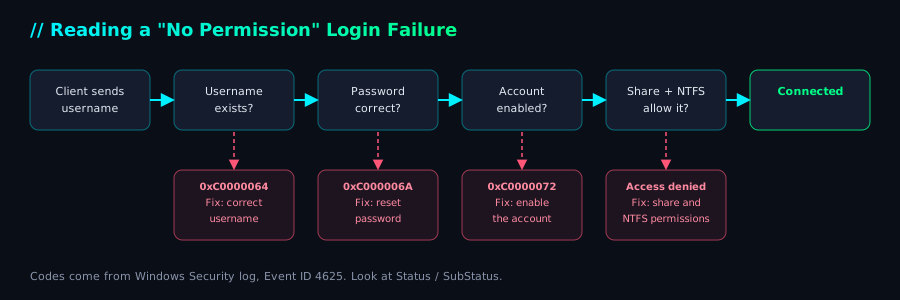
The failure code tells you what’s wrong:
0xC0000064means the username doesn’t exist,0xC000006Ameans a wrong password, and0xC0000072means the account is disabled.Mounting the share directly from Terminal worked, which showed that the share itself was fine. The problem was a saved connection on the Mac, not the server.
The lesson: when access is denied, check the server first, then read the logs. Don’t assume the client is right.
Security Checklist
- Keep it on your home network. Don’t forward port 445 or open the share to the internet.
- Use a dedicated account with a strong password. It only needs access to the share.
- Keep the network Private. Don’t enable file sharing on public Wi-Fi.
- Keep a second copy of anything important. One drive can fail. A shared folder is convenient, not a backup.
Summary
You don’t need a NAS to share files between your devices. The Windows PC you already own can do it, with a few commands and a router setting. Wi-Fi 6, built-in SMB, and large internal drives make it practical now in a way it wasn’t before.
Start with one folder, connect one other device, and move something real across. That takes about ten minutes and is the fastest way to find out whether it works for you.